PASSPORT RENEWAL REQUIREMENTS & DFA Appointment Process

In general, passport renewal is much easier than applying for the first time. But is the renewal process still the same during the pandemic?
We recently renewed our passports, and based on our experience, it’s pretty much the same. Understandably strict implementation of safety protocols are observed and the office hours and daily capacity have been adjusted to ensure proper social distancing. But other than that, not much has changed.

Welcome to our step-by-step guide to DFA PASSPORT RENEWAL. In this post, we’ll share with you the requirements you need to prepare, the steps you need to take, and some additional reminders and tips you might want to remember. Again, this is for RENEWAL. If it’s your first time applying for a passport, check this article instead: NEW PASSPORT APPLICATION REQUIREMENTS!
WHAT'S COVERED IN THIS GUIDE?
LIST OF PHILIPPINE PASSPORT RENEWAL REQUIREMENTS
These are the requirements for the REGULAR passport renewal:
1. Online Appointment Confirmation
You need to secure your slot by setting an appointment on the official website.
If you can, do it months before your desired travel date to give you enough lead time. Due to the large volume of applications, slots fill up fast. We’ll discuss this further in the HOW-TO section below.
2. Duly Accomplished Form
During the appointment process, you’ll be asked to fill out the application form so you don’t need to do this again. A link to your accomplished form will be sent to you via email and all you need to do is download and print it out (along with other attached documents).
But if, for whatever reason, you need a blank copy of the application form, you can get it here. You need to print it out on A4 size paper.
3. Current passport with photocopy of bio page
Aside from the original copy of your current passport, you must also submit a photocopy of the bio page.
Usually, there are photocopy machines at the DFA center and photocopying services around the area. Just to be sure, have it photocopied before your appointment schedule to avoid delays and wasting time.
4. Personal Appearance
All applicants must be physically present at the DFA Office on your appointment schedule.
The renewal process entails collecting your biometrics data and taking a photo of you. For passport photo capturing, take note of the proper attire or dress code. Colored contact lenses and accessories like earrings, necklaces, or other facial piercings are not allowed during photo capturing.
POSSIBLE ADDITIONAL REQUIREMENTS
DFA announced that birth certificates for passport renewals are no longer required, BUT there are some exceptions. You still need to present your birth certificate if:
- You lost or damaged your current passport.
- You are holding old brown or green passport with no complete middle name.
- You are making changes in your personal information.
- You are included in the DFA watchlist.
Depending on your status or your current passport’s condition, here are other possible additional requirements for passport renewal:
If you’re holding a non-ePassport
If you’re holding a non-ePassport, provide the following:
- original current passport
- photocopy of the bio or date page
- valid ID and a photocopy (See list of acceptable IDs in the FAQ section below)
Note that not all passports are ePassports. An ePassport has an integrated circuit chip or microchip where the biometrics data are stored. The DFA only started issuing ePassports in 2009. How to know whether you have an e-Passport or a non-ePassport? Here’s how to distinguish:
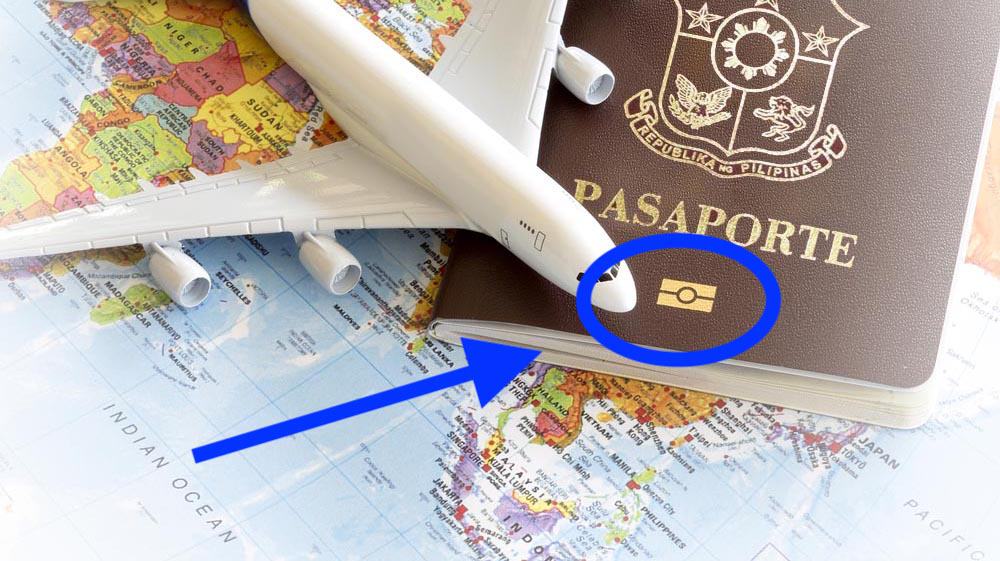
- ePassport: There is a chip sign or icon at the bottom portion of your passport’s front cover.
- Non-ePassport: It may be brown, green, machine readable passports (maroon), or any older passports. It doesn’t have the chip sign or icon on your passport front cover.
If your name has changed
Additional documents to prove and support the name change must be provided. Depending on your situation, these are the documents needed. Note that these must be PSA-authenticated.
- Marriage Contract
- Annotated Birth Certificate
- Annotated Marriage Contract to show annulment/divorce/court ordered instruction
- Death Certificate of Spouse
NOTE: You do not need to present your Marriage Contract if you recently married but you chose to keep your maiden name.
You might also need an NBI Clearance ONLY IF the marriage took place within 6 months before the date of passport application. This is according to the DFA Facebook page when we inquired.
If the applicant is a minor
For minor applicants or those applying for a minor, these are the additional requirements:
- Proof of affiliation and/or guardianship with one (1) photocopy. If you are presenting the minor’s Birth Certificate as proof, it must be PSA-authenticated. Provide the original birth certificate printed on PSA security paper and a clear photocopy. If the PSA-authenticated Birth Certificate is not readable, get a copy from the Local Civil Registrar.
- School ID (if applicable)
- Valid Government-issued ID of either parent with one (1) photocopy. See list of accepted IDs in the FAQ section below.
IMPORTANT! Personal Appearance of both the minor applicant AND either parent (or authorized adult companion) is mandatory.
- If only one parent is accompanying the minor, Marriage Certificate must be presented. If the parents are unmarried, the Mother must execute a Special Power of Attorney if she is not accompanying her child. Special Power of Attorney executed outside the Philippines must be authenticated by the Philippine Embassy or Consulate in that foreign country.
- If either parent can’t accompany the child for the application, a Special Power of Attorney must be executed by the parent to designate and authorize someone else to accompany and help the child through the application process. A copy of parent/s valid ID and/or passport attached to the Special Power of Attorney or Affidavit of Support and Consent. The authorized adult companion must present his/her Passport or Valid Government-issued ID. See the list of acceptable IDs above.
- If either parent is not traveling with the minor, DSWD Clearance and Affidavit of Support and Consent must be submitted. Affidavit executed outside the Philippines must be consularized by the Philippine Embassy or Consulate in that foreign country. The authorized adult companion must present his/her Passport or Valid Government-issued ID. See the list of acceptable IDs above.
NOTE: Before the pandemic, minors aged seven (7) and below don’t need to secure an online appointment. They could just walk in and use the courtesy lane. However, due to the COVID-19 pandemic health emergency, all courtesy lane service is strictly by appointment only.
Visit the DFA Consular website if you have other specific concerns and inquiries (no birth certificate, illegitimate child, etc.)
If your current passport is lost or damaged
Whether it’s an ePassport or non-ePassport, the process is the same for damaged or lost passport — NEW APPLICATION.
Therefore, you need to submit the requirements for a new passport application rather than the requirements for the passport renewal application. Check the list of requirements here: New Application Requirements!
But wait! On top of the requirements for new passport application, you need to provide the following:
- Lost VALID ePassport – Police Report (English). Submit the original and a photocopy.
– Affidavit of Loss (English). Submit original and a photocopy.
– Penalty Fee: PHP 350
– Additional 15 days for clearing process
- Lost EXPIRED ePassport – Affidavit of Loss (English)
– Penalty Fee: PHP 350
- DAMAGED ePassport – Surrender damaged passport
– Affidavit of Explanation
– Penalty Fee: PHP 350
NOTES: If you lost your passport but were able to save a photocopy of it, you don’t need to present your birth certificate anymore, but make sure you bring that photocopy with you.
Visit the DFA Consular website or contact the DFA directly if you have other specific concerns and inquiries.
STEP-BY-STEP PHILIPPINE PASSPORT RENEWAL PROCESS
1. Schedule an appointment online.
Walk-in applicants are normally not allowed EXCEPT for emergency and special cases. Regular and non-emergency applicants must secure their slots by setting an online appointment.
As much as possible, do it months before your desired travel date to give you enough lead time. Nowadays, if you try to secure an online appointment, the earliest available slot is more or less two months away. To give you an idea, say you decide to get an appointment in November, the earliest available slot might be in December, or if you’re unlucky, January.
But if you’re really unlucky, there may be no more slots available. In this case, you can either wait and try again another day or find an available slot in another DFA site.
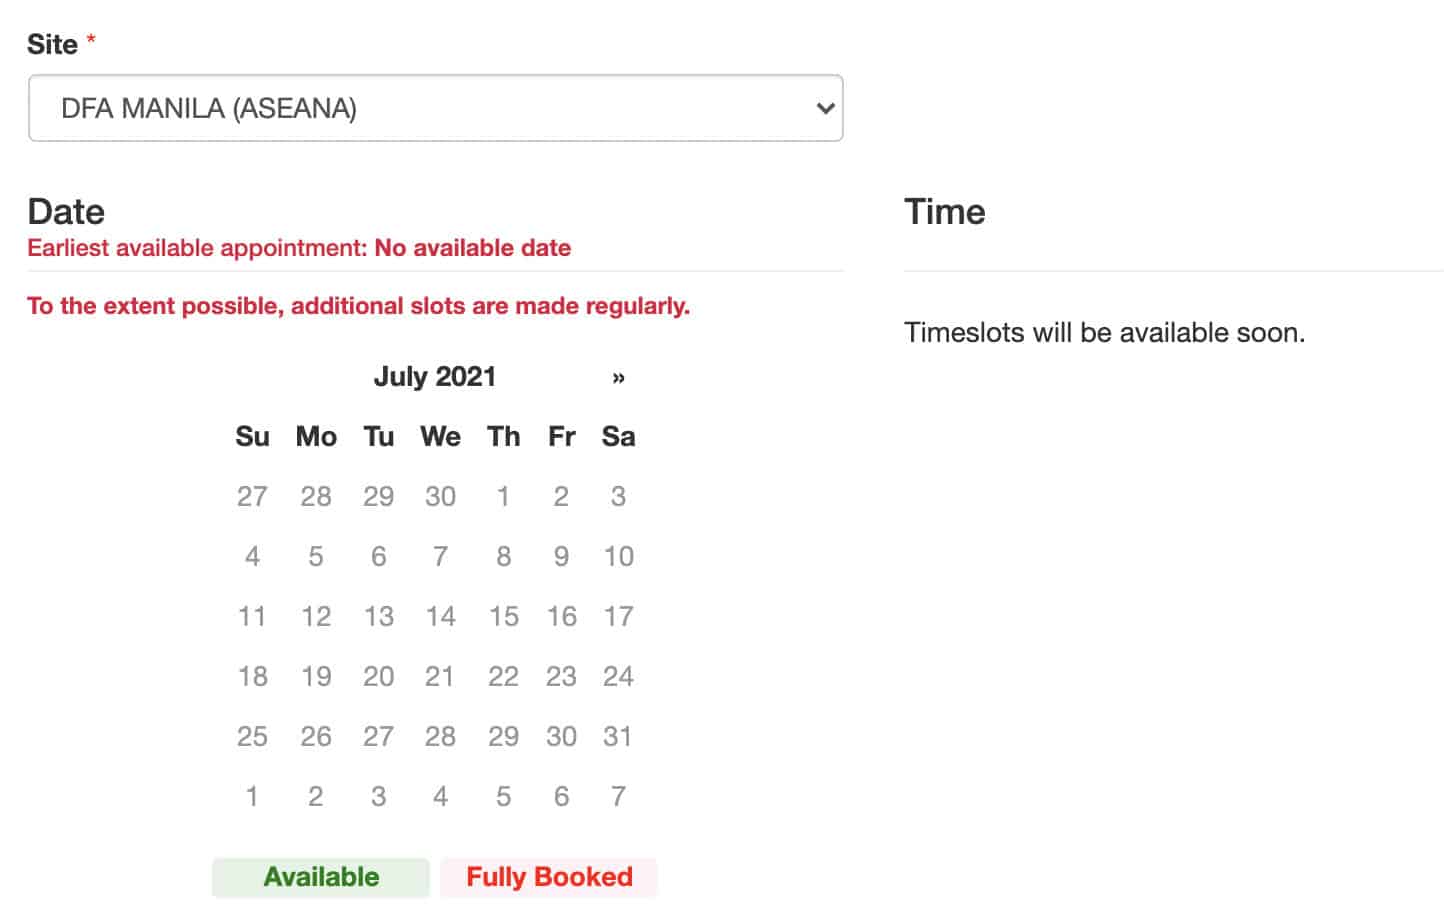
How to set an appointment online?
- Visit the DFA Online Passport Appointment System website.
- Read the Terms and Conditions, and then tick the box. This means that you have understood the terms.
- There are two options: INDIVIDUAL Appointment and GROUP Appointment. Choose the one that’s applicable to you.
- Choose a DFA office/branch. Select the one nearest you or the one most convenient for you. Later on, you can change it and check other branches if you are having a hard time securing a slot with your first choice. Hit the Next button.
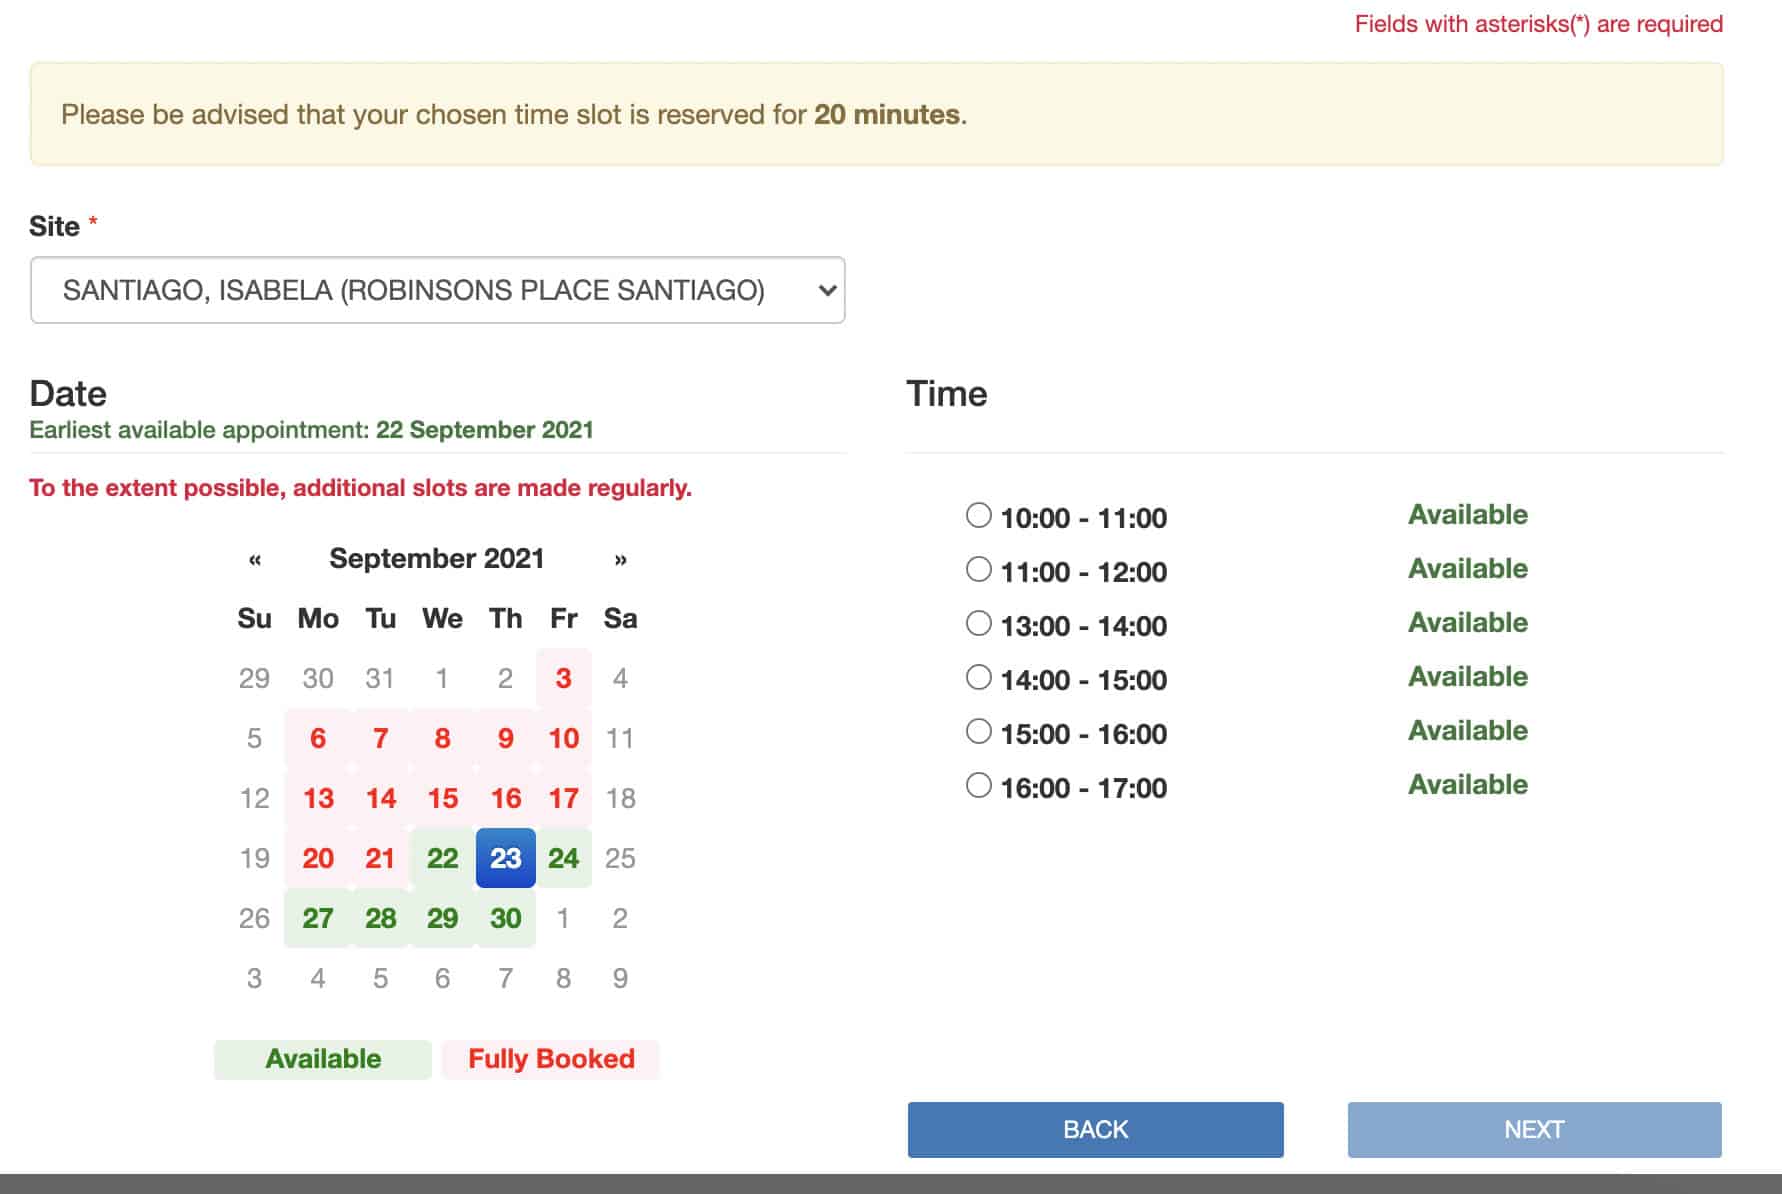
- Select a date and time from the provided calendar. The earliest open date is noted above the calendar. The dates in GREEN are AVAILABLE, while those in RED are FULL.
The most challenging and frustrating part is finding an available slot. There are just a lot of applications per day and slots are quickly filled. The DFA has taken steps to improve the system to serve applicants better, but it can still take a lot of attempts to finally find availability. You may check other branches or try again later.
You may also try some of these tips:
- Ensure that you have strong internet connection. When slots become available, they are snatched easily by other applicants. They will not wait for your network to keep up.
- List down all your preferred dates. This will give you more options in case the date you originally want is already full. This will save you time too. Instead of spending precious seconds weighing other dates, you already have shortlisted the most convenient dates for you.
- Decide quickly. Again, you are beating time here, so you must be decisive because slots can be taken in a snap. You see the date you want is still available one minute, but then it’s gone the next. Afternoon schedules are usually the first to get filled.
- Refresh the page. There are times when available slots pop out of nowhere. Well, these might be those slots reserved for applicants who failed to pay within the allotted time period.
- Check the site regularly. As much as possible, the DFA opens additional slots daily. The system refreshes regularly, so check the site from time to time for possible additional slots.
- Try searching at around these times: 6AM – 8AM, 12NN, and 9PM. Available slots usually appear at these times, from Mondays to Saturdays (except holidays).
- Search other DFA branches/offices. There are six (6) branches in Manila: DFA Central (ASEANA), DFA NCR North (Robinsons Novaliches), DFA NCR Northeast (Alimall), DFA NCR West (SM Manila), DFA NCR East (Megamall), and DFA NCR South (Alabang). However, these NCR branches run out of slots real quick. If you desperately need to renew your passport, you may try looking at regional branches/offices.
UPDATE: In addition to the regular processing sites, the DFA has set up Temporary Off-site Passport Service (TOPS) facilities within Metro Manila that can process passport applications. These are:
– Robinsons Las Pinas
– Robinsons Magnolia, Quezon City
– SM Aura, Taguig
– SM Mall of Asia, Pasay
– SM North EDSA, Quezon City
But certain restrictions apply. Passports processed at any of these TOPS sites will be shipped via courier, adding an extra 3 to 5 working days. Payment for TOPS is via CREDIT CARD or DEBIT CARD ONLY! Make sure you have your card with you when you start the appointment process.
When you get a slot, you need to finish the next step within 20 minutes or lose that slot.
2. Accomplish the Online Application Form.
After you get a slot, you will be directed to the next step, which is filling out the four-page online application form. Remember, you only have 15-20 minutes to complete this so prepare the following information:
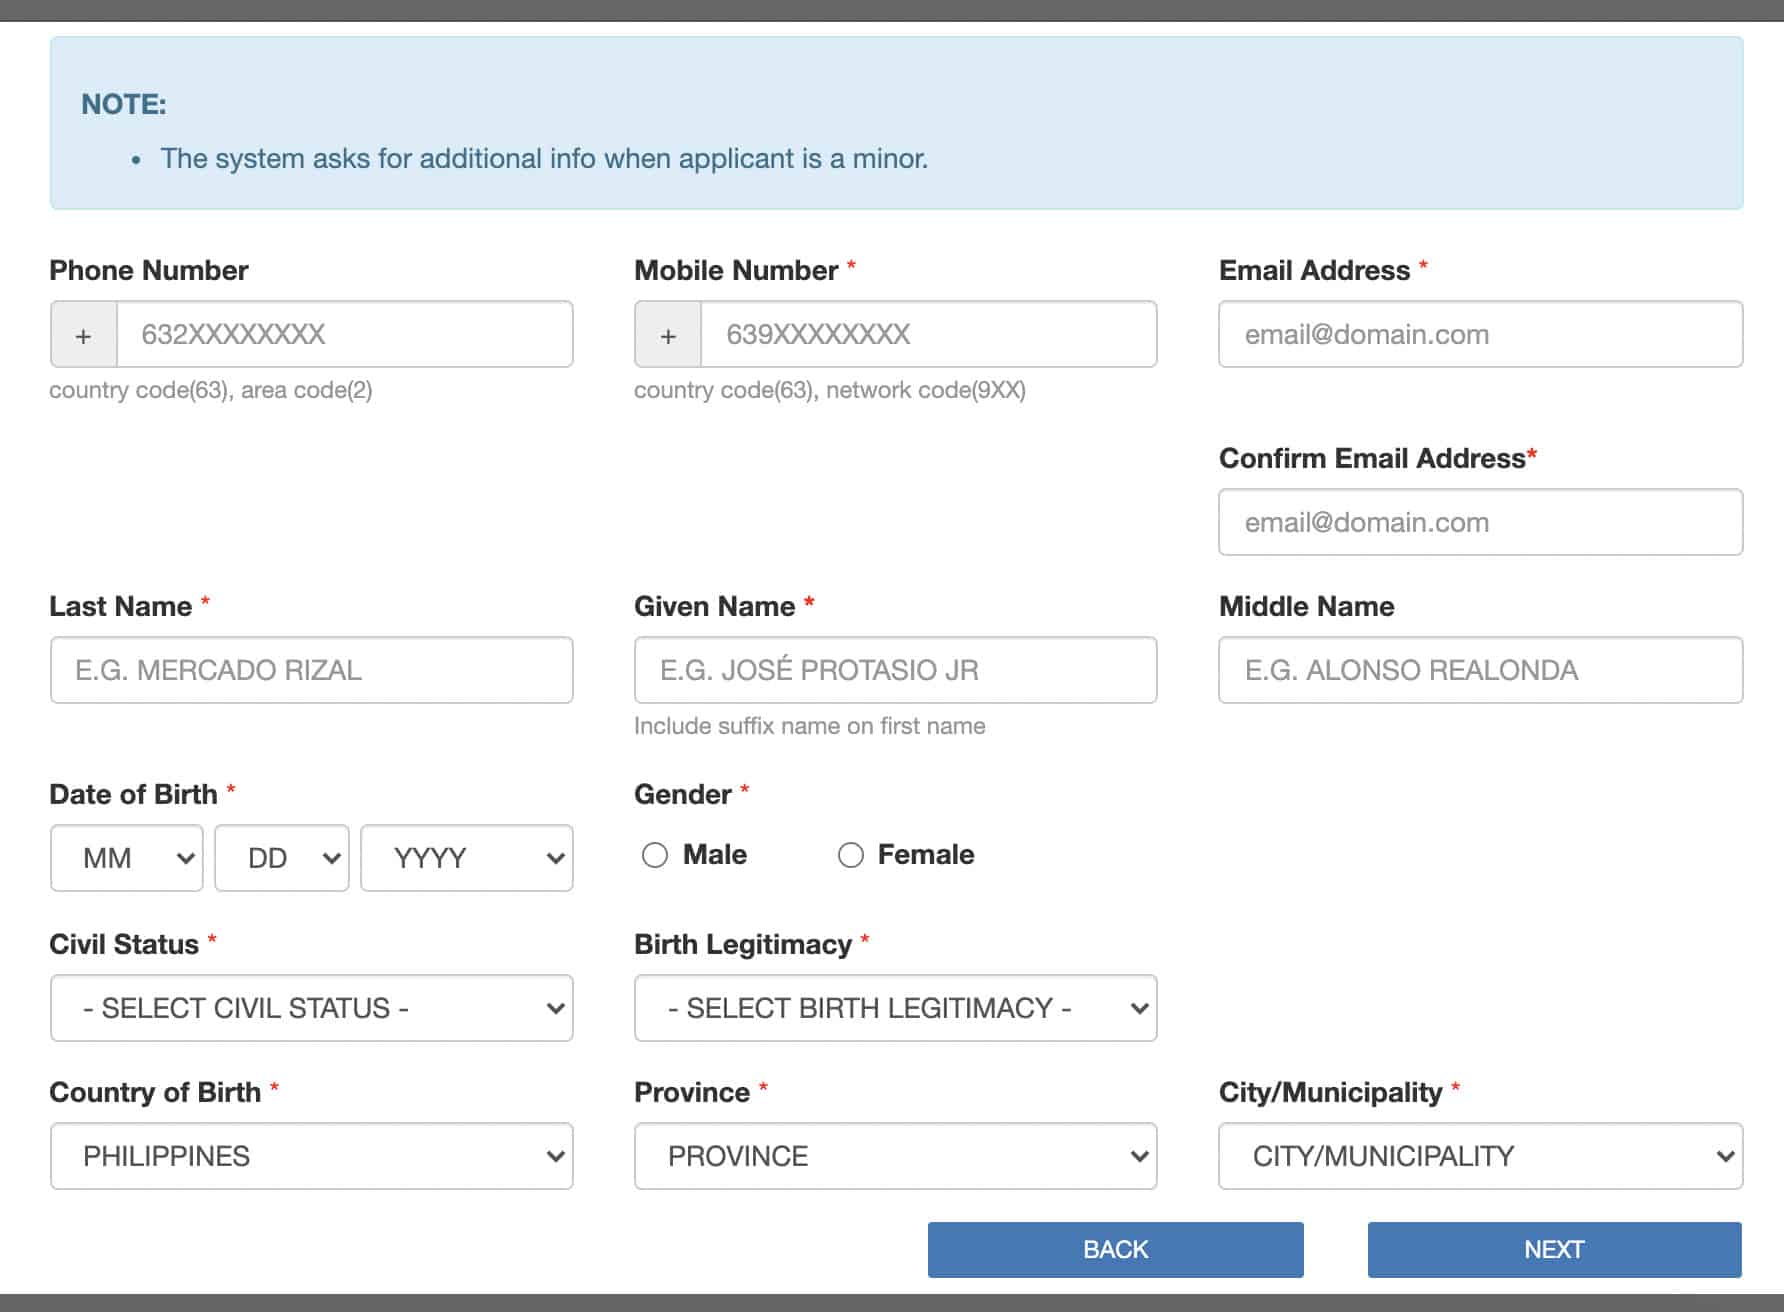
- Personal Information: The first page contains your Personal Information such as Name, Birth Date, Contact Numbers, E-mail Address, etc. For your email address, input your free Gmail account. I tried using my custom email address at first, but I failed to receive a confirmation email that also contains the reference number for paying the passport processing fee. I had to wait for the schedule to expire after 24 hours to try to set an appointment again. On the second try, I used my free Gmail account and immediately got the email confirmation.
- Family Information: The second page requires your Family Information like your Parents’ and Spouse’s names and Citizenship.
- Application Information: The third page is all about your Application Information including Application Type, Citizenship, and Emergency Contact Person and his/her contact number. For the Application Type, choose RENEWAL. For lost or damaged ePassport/non-ePassport, choose NEW APPLICATION.
- Contact Information. The fourth page asks for your home and office addresses and contact numbers.
You will be given time to check all the information you input. Make sure you have no typos and everything is correct.
3. Settle the Processing Fee.
Choose one of the two processing options, depending on what applies to you:
- Regular Processing: This costs P950 and takes 10-15 days in Manila.
- Express Processing: This costs P1200 and takes 5-7 days in Manila.
- Foreign Service Posts: The fee is $60 and takes 28-60 days.
We heard that the processing time in the regional offices takes longer compared to Manila. They say the length of days for processing may take 20-30 days, but we haven’t confirmed this yet.
This is how the payment process goes:
- Select between regular or express processing.
- Then hit PAY NOW.
- A message will pop up. Click the “I agree” box, then hit PROCEED TO PAYMENT.
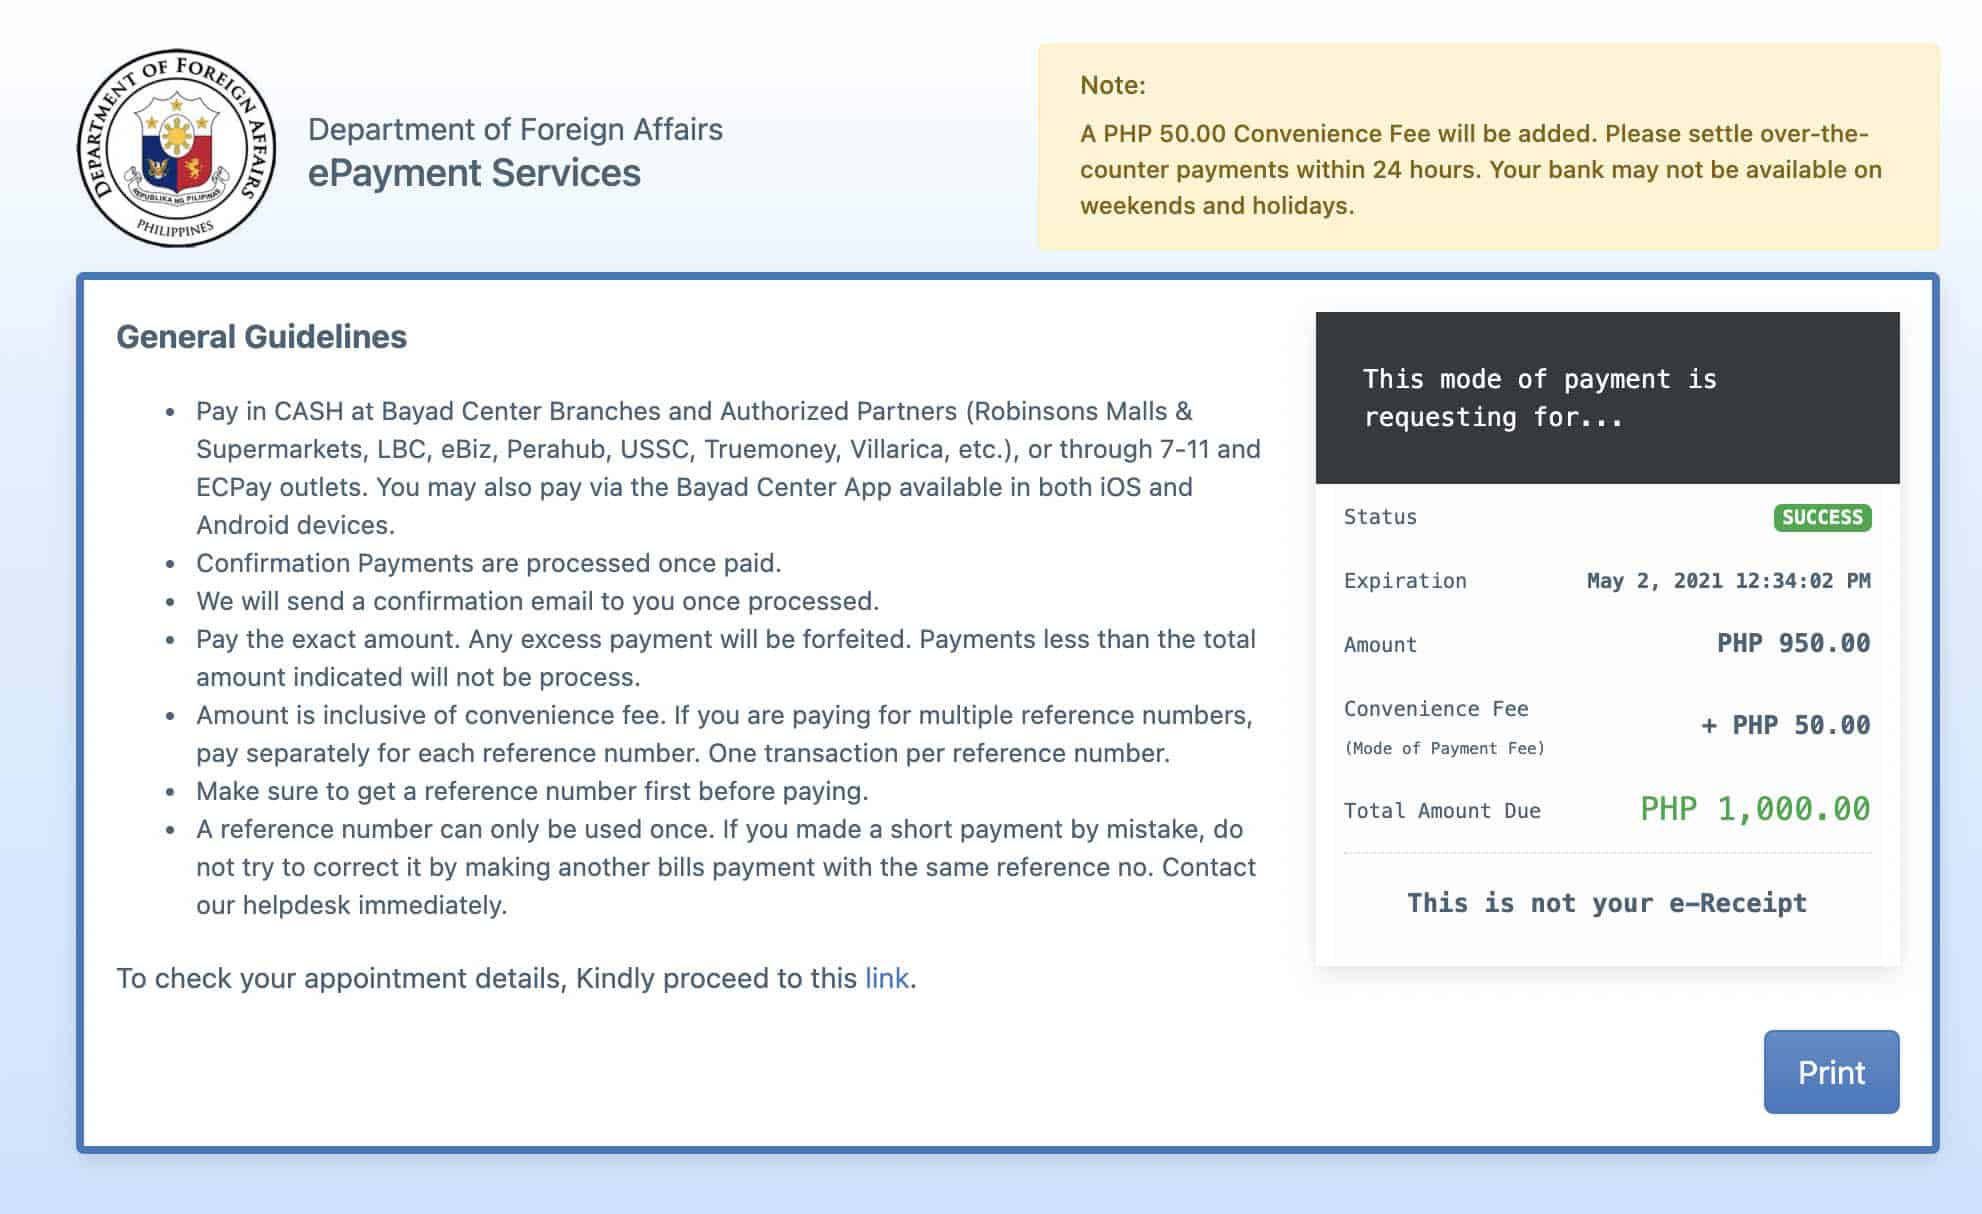
- You will land on the PAYMENT page where you will see the payment options, the total amount that you need to pay, and some reminders. A convenience fee of P50 per person is normally added on top of the total processing fee amount. Hit PROCEED.
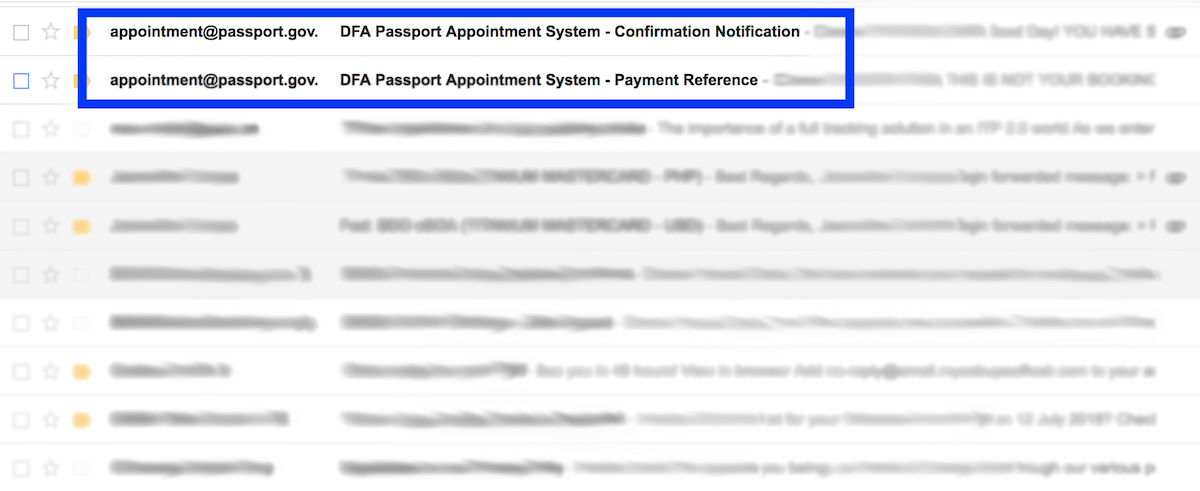
- You will receive an email providing your Payment Reference Number and instructions on how to settle your payment. Hold on to your reference number.
- You need to pay the processing fee within 24 hours. Go to your chosen authorized payment center. You have to secure a copy of your reference number. Make sure you declare and pay the exact total amount.
- After payment, an appointment confirmation will be sent to your email. You will find three files attached to the email: your application form, the receipt, and the checklist. You need to secure a hard copy of each file. Print them all out. Use A4 paper. You need to bring them on the day of your appointment.
REMINDERS:
- These are the authorized payment centers for paying the passport processing fee: – Bayad Center
– EcPay
– Pera Hub
– Robinsons Business Center and Department Stores
– Waltermart Department Store
– 7-Eleven
– USCC (Western Union)
– Villarica Pawnshop The credit card/debit card payment facility and the over-the-counter cash transaction in selected banks are not yet available.
- You need to pay the EXACT amount. No more, no less. The payment will not be processed or will be forfeited if it’s not the exact amount.
- You can only use your Reference Number once, meaning one transaction per reference number.
- An additional convenience fee may apply per applicant.
- An additional fee of P350 will be charged for Lost and Mutilated ePassports. Prices may vary for applications filed overseas depending on the foreign service post.
- Lost Valid Passports will need additional 15 business days clearing period.
- There will be no express/expedite processing during Enhanced Community Quarantine (ECQ) and Modified Enhanced Community Quarantine (MECQ).
- Expect changes in the release date of the passport during the ECQ/MECQ period. The DFA will notify you of any changes to your schedule through email.
- If you encounter any problems regarding payment, contact the DFA helpdesk immediately at (02) 234 3488 or email your concern to info@passport.gov.ph.
In my case, I chose to pay via 7-Eleven. I used one of their in-store electronic machines, chose “bills payment”, and then selected DFA. I input my reference number and the total amount, which includes the P50 convenience fee. I took the printed slip and went to the cashier to pay. That’s it!
4. Head to the DFA Site you picked.
When the date of your appointment finally arrives, you need to appear personally at your chosen DFA office. Don’t forget to bring all the required documents with you, plus the Application Form printout (hard copy), the checklist with your confirmed schedule, and your eReceipt (two copies).
REMINDERS:
- Don’t be late. Be there at least 30 minutes before you confirmed schedule. Those who arrive late for their appointment will not be accommodated.
- Make sure to bring all the requirements — both the original and the photocopies.
- The DFA implements a “No Escort” policy. Companions, who are not applicants, are not permitted within the DFA premises UNLESS they are the guardian of a minor or they are assisting a person with special needs.
- Wear proper attire. The DFA enforces a strict dress code, which prohibits wearing spaghetti straps, sando, plunging neckline, sleeveless top, tube top, halter top, and see-through top. Colored contact lenses, eyeglasses, and accessories like earrings, necklaces, or other facial piercings must be removed during photo capturing.
- Make yourself presentable, looking your best. Remember that your photo will be taken for your passport with 10-year validity, so that image of you will stick with you for a long time. But please avoid applying too much makeup.
For my most recent passport renewal, I was fortunate to get a slot at the branch nearest to where I live — DFA NCR South. My appointment was at 5:00 PM, so I arrived at 4:30 PM. Here’s my experience:
- Document Verification. Even at the entrance, the guard will ask for the checklist with your confirmed schedule. They will check if you bring all the requirements with you. Don’t forget to bring a photocopy of your old passport (renewal) or valid ID (new application).
- Processing. They will review your documents/requirements. When they are done checking, they will stamp your receipt with a date of release. Let them know if you still need your current valid passport for an upcoming trip because this is where they will punch holes on your old passport. The officer asked me first if I will no longer use my old passport before punching holes. But this might not be always the case, some officers might proceed to punch holes if you don’t give them a heads up.
- Data Encoding and Biometrics. This is the part where they will encode your personal information like your name, birth date, and other details. They will give you time to check the encoded details on the computer screen, so check those spelling and typos. After that, they will take your photo, fingerprints, and signature.
- Delivery. This is an additional step for those who want their passports to be delivered instead of personally picking them up at the DFA office. DFA partners with courier and forwarding service companies. I availed of this service and paid the delivery fee of P150. They will take your application receipt and then hand you their own delivery receipt. Expect your passport to arrive one to two days after the scheduled release date. You may skip this part if you want to personally pick up your brand new passport on the scheduled release date.
NOTE: A team member applied at DFA ASEANA. If you are also applying there, some touts will trick you into buying a long brown envelope or ballpen. You do not need them. You can put your documents in a folder or envelope if you want to keep them neat and organized. It won’t hurt also to bring an extra pen just in case.
5. Claim your new passport.
If you did not avail of the passport delivery service, you have to return to the DFA site on the indicated release date of your passport. If there’s a change in the schedule, the DFA will email you in advance.
Make sure you bring your application receipt and other proof like the claim stub, if applicable. Check all the details on your passport before leaving the counter. Make sure your name is not misspelled and there are no typos.
What if you can’t claim the passport yourself?
An immediate family member can claim your passport on your behalf, provided that she has an authorization letter prepared and signed by you and other requirements. An immediate family member can be your mother, father, brother, sister, husband, wife, or child of legal age. They must bring the following:
- Authorization Letter
- Original Receipt
- Applicant’s Valid ID (original and photocopy)
- Representative’s Valid ID (original and photocopy)
What if the only person available on your behalf is not an immediate family member?
If no immediate family can claim it for you, the person must bring the following:
- A Special Power of Attorney
- Original Receipt
- Applicant’s Valid ID (original and photocopy)
- Representative’s Valid ID (original and photocopy)
FREQUENTLY ASKED QUESTIONS (FAQs)
What are the acceptable IDs?
Any of the following Valid IDs:
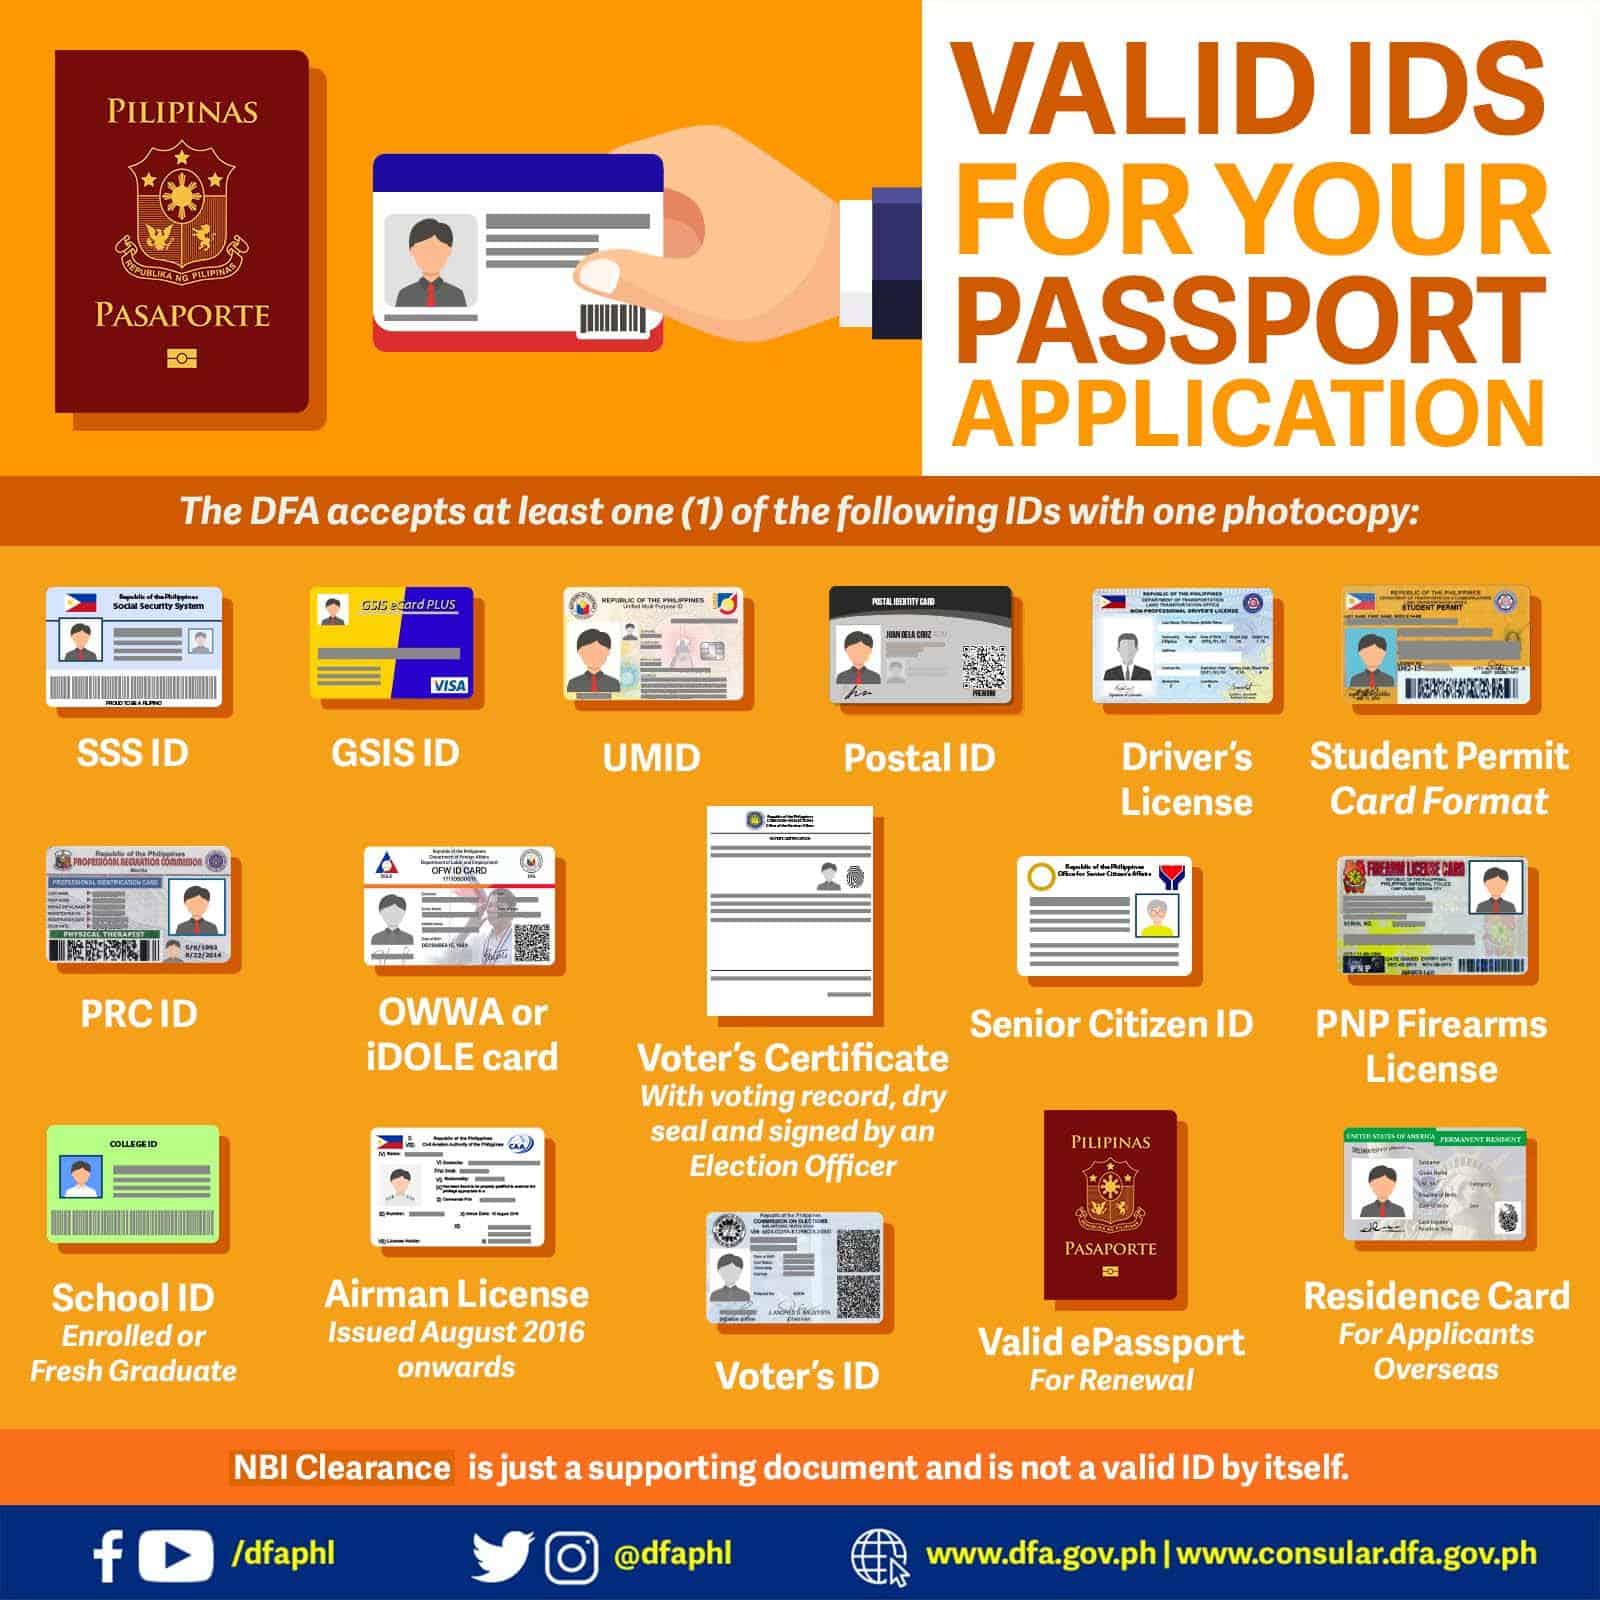
- Social Security System (SSS) Card
- Government Service Insurance System (GSIS) Card
- Unified Multi-Purpose ID (UMID)
- LTO Driver’s License
- Professional Regulatory Commission (PRC) ID
- Overseas Workers Welfare Administration (OWWA) E-Card
- Voter’s ID or Voter’s Certification from the Main Office with Dry Seal. If presenting the Voter’s Certificate, you may also need to provide NBI or police clearance. [Update: As of Aug 2022, the DFA website states this: Voter’s ID or Voter’s Certificate issued from COMELEC main office in Intramuros, Manila. They have removed the part about certificates issued by the regional offices and NBI/Police Clearance. We’re still clarifying if Voter’s Certificates from regional offices are still accepted and whether or not the NBI/Police Clearance is still needed. Will update this again as soon as we have the answers, but for now, please contact DFA directly for clarifications.]
- PNP Firearms License
- Airman License (issued August 2016 onwards)
- Philippine Postal ID (issued November 2016 onwards)
- Senior Citizen ID (if senior)
- School ID or Certificate of Enrolment with student’s photo and the school’s dry seal (if student)
- Philippine Identification (PhilID)
- Seafarer’s Record Book (SRB) issued from February 2020 onwards by the Maritime Industry Authority (MARINA)
REMINDER: Make sure that all IDs (original and photocopy) are readable, untampered, and must contain the same information as other documents presented.
How early can I renew my passport?
You can apply for passport renewal as early as one (1) year before expiry.
The Bureau of Immigration requires passport validity of at least six (6) months to allow you to exit the Philippines and travel abroad. If you have immediate plans to travel out of the country, it’s safer to renew your passport one (1) year before expiry because securing a slot through an online appointment is quite challenging.
I still have valid visas in my old passport. Can I still use them after I renew?
YES. The visa remains valid even if the passport is no longer valid. Just bring the old passport with the valid visa and your new passport when you travel.
I personally experienced this. I had a multiple entry visa in my old passport and I didn’t encounter any problems when I presented my old passport (with punch holes and valid visa) to the Immigration Officers both here and abroad. They will just check the valid visa in my old passport and the bio page of the new passport.
Can I apply in the province even if I’m not a resident there?
YES. The most important thing to do is to make sure you have a confirmed appointment. Just remember that the processing days differ per area/region. You can check that on the payment part of your online appointment process.
Does everyone need to get an appointment before applying?
Before the pandemic, only regular applicants are required to get an online appointment. Those who are eligible to use the courtesy lane don’t need to book an appointment. They can walk in anytime using the courtesy lane. These are:
- Senior citizen and 1 companion.
The companion must be an immediate family member. If not, the companion must show proof of travel arrangements with the senior to show they’re traveling together. It can be a plane ticket or hotel booking.
- Person with disability and 1 companion.
Companion must be an immediate family member. If not, the companion must show proof of travel arrangements to prove that they’re traveling together. It can be a plane ticket or hotel booking.
- Pregnant woman.
A medical certificate or records must be presented if the baby bump is not yet noticeable.
- Minor seven (7) years old or below, plus their parents and minor siblings.
- Solo parent and their minor child.
The parent must present a valid solo parent card.
- OFWs: Land-based and Sea-farers.
Must bring any of the following: valid iDOLE card, work visa, employment contract, or seaman’s book stamped at international border less than 365 days from date of application.
However, since the COVID-19 pandemic hit, walk-in services are suspended until further notice. This is to manage and control foot traffic. Those who are eligible to use the courtesy lane are also required to book an appointment online.
For urgent applications, you can send an email at oca.cl@dfa.gov.ph.
I didn’t get an email when I secured an appointment so I don’t know my reference number. What should I do?
First, check your Spam or Junk folder. Still can’t find it there? You may try this:
Go to passport.gov.ph then click “View Appointment”. You need to provide your appointment code, which is your payment transaction code. And then, enter your email address. Check your email for the confirmation and the forms you need. This one is based on the recent experience of my friend Mai Tendero.
You may also call the DFA hotline (02) 556-0000 or (02) 234 3488 OR email your concern to info@passport.gov.ph.
If you have to do the whole appointment process again, make sure that you are using a free Gmail account next time.
This happened to me. I tried using my custom email address at first, but I failed to receive a confirmation email that also contains the reference number for paying the passport processing fee. I had to wait for the schedule to expire after 24 hours to try to set an appointment again. On the second try, I used my free Gmail account and immediately got the email confirmation.
Can I reserve multiple appointment slots for myself just in case I change my mind?
NO. If you have an existing application, the system will tag another attempt to get a slot under your name as an ERROR.
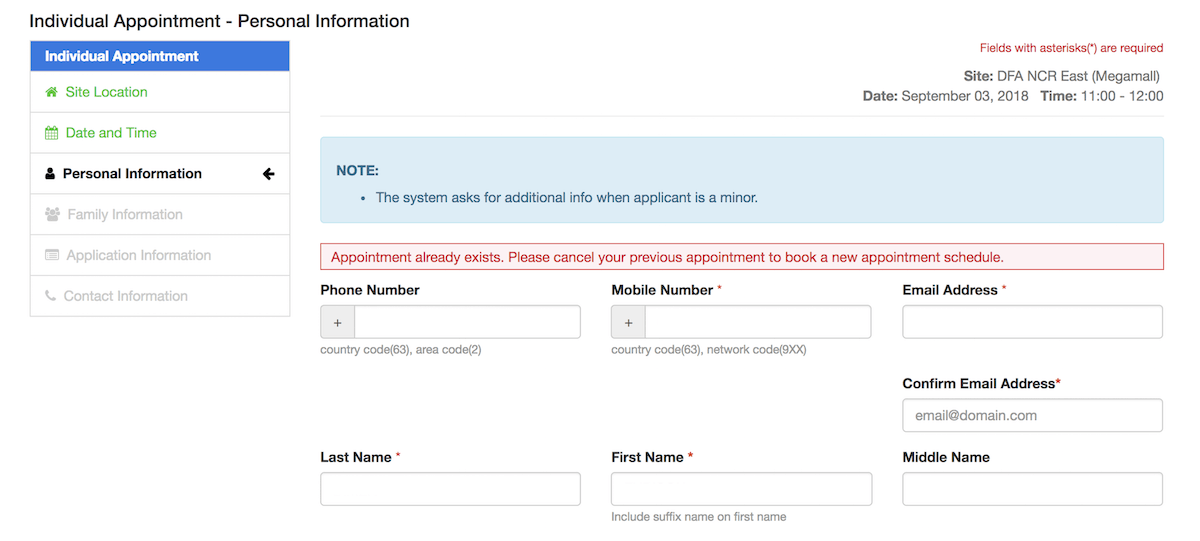
The only way for you to reserve anew is to CANCEL the first/existing one.
I can’t make it on my appointment schedule. What can I do?
You have the option to either RESCHEDULE. However, changes must be made at least three (3) working days before your schedule. If you fail to do this, the system will mark and penalize you.
If rescheduling isn’t an option, you can also CANCEL your appointment and do the whole process over again.
How to reschedule my appointment?
Go to this page, and then click on View Appointment. Input your Appointment Code and your email address, then click on View Details. Once logged in, choose RESCHEDULE.
You should be able to do this no later than 3 days before your original schedule. The rescheduled date must be within 30 days of the original date.
I missed my appointment. What can I do?
Wait 30 days. There is nothing else you can do if you didn’t show up on your appointment schedule.
As a penalty for “No Show” applicants, you have to wait for 30 days to make another appointment.
I found an error on the application form. Can I still change it?
Yes, but NOT online. You can correct it at the DFA office on your appointment schedule. Remember that during the data encoding stage, you will be asked to check and review the information entered by the officer. This is your chance to correct the mistake or misspelling.
What should I work on first if I need to get a DSWD Clearance, passport, and visa for a minor?
Here’s the correct order: DSWD Clearance first, then Passport next, and finally, Visa.
The reason is: DSWD Clearance is a requirement when applying for a passport for a minor. And a passport is a requirement when applying for a visa.
Do I really need to appear personally at the passport site?
YES. Your photograph, signature, and biometrics will be taken, so your physical presence at the DFA office is a must.
How long does the application process take?
We’ve renewed passport at these DFA offices: Megamall, ASEANA, Alabang, and Lipa. Based on our experience, it took us roughly an hour — from document verification to availing of the delivery service.
How many days should I expect to wait for the release of my passport?
Based on my recent application, my appointment was on September 12. I signed up for the passport delivery service and got my passport on September 22. That’s a total of 10 days.
More Tips on YouTube ⬇️⬇️⬇️
Is this post helpful to you?

Related Posts:
- Chinese Visa: How to Apply and Get One Successfully
- Taiwan Visa and e-Visa for Filipinos: How to Get It Successfully
- TAIWAN VISA-FREE Entry Requirements (Until July 2020)
- MULTIPLE ENTRY JAPAN VISA: Requirements & How to Apply
- HOW TO APPLY for a SOUTH KOREA VISA in CEBU
- SOUTH KOREA VISA APPLICATION FORM
- JAPAN VISA FOR VISITING FRIENDS OR RELATIVES: Requirements & Steps
- JAPAN VISA: LIST OF TRAVEL AGENCIES Accredited by the Embassy
 Follow me on
Asta is the Managing Editor at PhilippineBeaches.org and a regular contributor to The Poor Traveler. She's also a mountaineer, production designer, and cineaste.
Follow me on
Latest posts by Asta Alvarez (see all)
- Top 35 BANGKOK Things to Do & Places to Visit - 28 July 2024
- 2024 STILTS CALATAGAN Beach Resort Travel Guide with Itinerary & Budget - 7 April 2024
- TOKYO SKYTREE TRAVEL GUIDE: Know Before You Visit! - 30 March 2024


 Follow me on